- Published on
Portainer: The What, The Why And The How
- Authors

- Name
- Tibo Gabriels
A deep dive into Portainer, managing your docker ecosphere.
Howest Brugge
Abstract
In the world of DevOps, containers are all the rage. One of the technologies that drives this revolution is Docker. To manage Docker virtual environments, a comprehensive interface is needed. While the command line offers everything that might be needed, an intuitive graphical interface can give newcomers the confidence to explore all its features at their own pace and experts the workflow needed to quickly analyze and utilize their Docker environment. An example of such a platform is Portainer, which makes DevOps accessible and efficient with just that, an intuitive GUI.
Let’s take a look at the what, the why and the how!
Contents
- Abstract
- What is Portainer?
- What is a container?
- What is Docker?
- So what does Portainer do?
- How does it work?
- Exploring Portainer
- What do I need for Portainer?
- How do I install Portainer?
- Using Portainer
- Creating an administrator
- Taking a look around
- Creating your first container
- Managing containers
- Using stacks
- Conclusion
What is Portainer?
(Portainer, n.d.) Portainer is a powerful enterprise grade Container Service Delivery Platform. It can also be interpreted as an Internal Developer Platform, a Kubernetes GUI, Containers as a Service, Kubernetes operations platform.
But what does this all mean? Let’s take a few steps back.
What is a Container?
A container can be defined as a package that comprises everything an application could need, all available in a virtual environment. This package includes an operating system kernel (generally Linux or Windows based), dependencies, and of course, the program itself. Importantly, this is all optimized to run in a lightweight and efficient manner. This makes container-based applications extremely portable, with the advantage of being able to run anywhere without having to deal with compatibility or dependencies.
What is Docker?
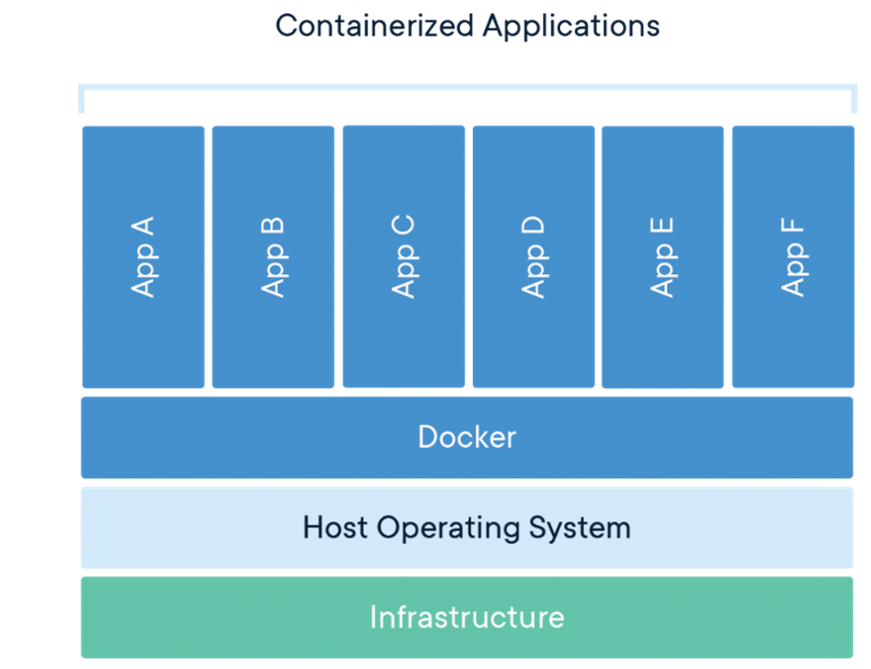
The Docker Engine is software that provides the functionality to create, run, and manage containers. It is available for both Linux and Windows (requiring subsystem for Linux 2). In figure 1 you can see that the Docker engine labelled “Docker” runs on the host OS and can run several applications side by side. A sister technology called Docker swarm allows for the orchestration of various containers, running on many servers/nodes. But in contrast to Docker, it is not the de facto enterprise standard, that honor goes to Kubernetes.
An important part to docker are images. A Docker image, just like an image you might download to install an operating system, is a single file that contains everything a container is and does. Being able to easily create, clone, and edit these images allows for an enormous ecosphere of images to flourish in the open source community.2 Want to create a web server to host your first website? There’s an image for that! Want to host a Minecraft server for you or your kids but don’t know how? Just download a Docker image! I could go on but if you really want to experience the vastness of the Docker ecosphere, visit DockerHub and begin exploring.
So what does Portainer do?
Portainer is an enterprise grade DevOps platform for deploying and managing containers. But don’t let “enterprise grade” discourage you. Portainer Community Edition (Portainer-ce) is a free and open source software containing all the functionality of Portainer that a hobbyist or even a small team might need. Interestingly, Portainer-ce has active community forums containing a lot of information if you would have a question or a problem.
How does it work?
Portainer is a Docker container that runs on the Docker engine. It provides a clear and concise, yet comprehensive, user interface to interact with the Docker API. It allows you to easily manage images, install containers, and monitor them. Furthermore, management of container stacks is also supported which are multiple containers deployed together with something called Docker compose. But let’s not get ahead of ourselves.
Exploring Portainer
What do I need for Portainer?
Let’s go over some perquisites before we dive in. As previously mentioned, Docker runs on both Linux and Windows (trough wsl2). For this tutorial, I’m assuming you have Docker installed on a Linux environment, but the process should mostly be the same for Windows. If you need help installing Docker, take a look at this or this for Linux or Windows, respectably. Before we install Portainer, also make sure the ports 8000 and 9443 are unused. If you require ‘HTTP’, 9000 will also be required. If these ports are occupied or needed elsewhere, different ports can also be used, as I will detail later.
How do I install Portainer?
Luckily, Portainer has good documentation that allows for easily following the steps. Portainer needs a volume to store its data. Use this command: Docker volume create portainer_data note: portainer_data is the volume's name, you can change this if you want Next, we will install Portainer using the Docker command:
Docker run -d -p 8000:8000 -p 9443:9443 --name portainer \
--restart=-always\
-v /var/run/docker.sock:/var/run/docker.sock \
-v portainer_data:/data \
cr.portainer.io/portainer/portainer-ce:2.9.3
Let’s break this command apart: Docker run -d -p 8000:8000 -p 9443:9443 --name portainer On the first line with the -p flag, we specify the port: the first number being the external port and the second number being the internal port. If you require Portainer to run on a different port, simply change the external port. As you can see, Portainer uses both port 8000 and port 9443. If you need HTTP to be enabled, make sure you add -p 9000:9000.
--restart=-always.
The second line specifies that the container should always restart, regardless of the reason it was stopped, intentionally or unintentionally. This is important when the system restarts or if unexpected error would occur.
-v /var/run/docker.sock:/var/run/docker.sock
On the third and fourth line, containing the -v flag, we specify volumes. The first volume is bound to your hosts' file system. In our case, it is specified that the files need to communicate with the Docker engine.
-v portainer_data:/data
While the other uses the volume we used earlier. If this volume was previously renamed, it is important to change portainer_data to the name you gave it.
cr.portainer.io/portainer/portainer-ce:2.9.3
On the fifth and final line, the image Docker will use is specified, which in this case is Portainer-ce. It is important to note the portainer/portainer-ce notation, as it indicates the author or creator with the first part and the container/repository’s name with the second part. Interestingly, both GitHub and DockerHub also use this notation. This annotation will be used here when dealing with other containers.
Importantly, Docker will first have to download the image, which can take a few minutes. However, if this image was already downloaded, this will be used.
After this, Portainer should be installed. To test this, either use the command Docker ps to view all active containers, or simply navigate to https://localhost:9443 to open Portainer.
Note: change localhost to another IP or hostname if you are doing this remotely. Also change the port if it was changed earlier. If all the above worked, great! You are now a Portainer user, let’s take a look.
Using Portainer
Creating an administrator
When you have successfully entered Portainer’s webpage, you will be prompted to create an administrator account with the username and password of your choice. You can also choose whether Portainer may collect usage data to improve Portainer.
Taking a look around
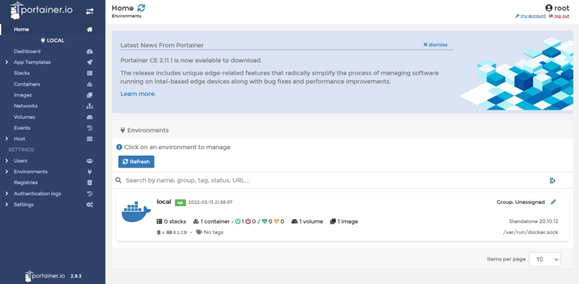
On the home page, you might see some Portainer news, but more importantly, you will see the overview of all environments and its contents. This should only include local environments/content, but more on that later.
On the left of the page, you can see a menu with all Portainer’s functionalities. Let’s start with the dashboard: simply click on local and it will take you to the dashboard of your personal local environment.
Here you can find some general information such as core-count, available RAM, and your Docker version. Below this, shortcuts are available to the most important menu’s, with some quick info. Let’s start with containers, as one should already be running: Portainer itself, of course!
Besides containers, we have stacks, which are containers grouped and managed together. Images show the Docker images that have been previously downloaded. These images can also be manually download or new images can even be created. Volumes, such as the ‘portainer_data’ we created earlier. And finally, networks, where we can create virtual networks to allow our containers to communicate with each other and the internet.
Creating your first container
Let’s create our first container! Head over to the container menu and click add container.
But first, what will we install? To keep this simple, let's install a web server. Perhaps Appache2? There is a container for that. Firstly, give your container a name.
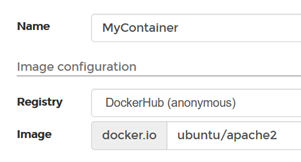
Secondly, we can leave registry as is since we will be pulling the image from DockerHub. Thirdly, type ubuntu/apache2. Remember the author/image notation? That’s right, Ubuntu has their own official container, which in this case is an apache2 server installed on… Ubuntu!
Fourthly, we want to publish our http port. Under Network ports configuration publish the tcp port 80. Lastly, scroll down to advanced container settings and go to restart policy.

Remember when we installed Portainer, we wrote restart=always. This was written as we want to be able to disable this container, and if our server restarts, we also want the container to restart. So, we will set the restart policy to unless stopped. We could also select never, on failure or always. But generally, unless stopped is the way to go.
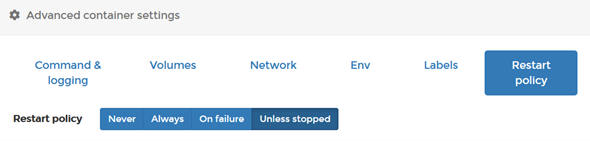
Besides restart policy, other important settings include Env (for environmental settings), network, and volumes. But for now, we can keep everything default.

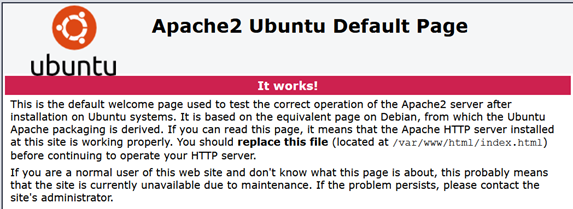
Let’s open a browser and go to http://localhost:80. You should now see your first container in action! We could of course create a website for our new container to run, however that would take us too far.
Managing containers
Deploying containers is only half the fun, next comes managing them. After creating your web container, you should see a list of containers, now only listing MyContainer and Portainer. This is the container menu. Click on MyContainer to manage it.
Scroll around and take a look, Portainer gives you some quick actions such as: start, stop, kill, ... Start and stop are both quite self-explanatory. Kill instantly stops the container without safe shutdown. Restart, Pause, Resume, and Remove all do what you expect them to. Finally, recreate removes the container, and then rebuilds it with the same configuration as before. Duplicate/edit can be used to change some settings or create a copy; by changing its name it will create a copy but if left unchanged, the new settings will be applied to the existing container.

Container status gives you an overview of some attributes such as ID or name, as well as some useful menu links. Logs, inspect and stats are great for analyzing your container or diagnosing problems, while console or attach gives you the ability to interact with the container is if it were a physical machine.
Using stacks
Another great feature of Portainer is the ability to create and manage stacks. Stacks can be described as a bunch of containers grouped together. You could for example group a frontend server, backend server, and a database together. This allows you to deploy them simultaneously, but also manage them together.
Head over to the stacks menu and let’s take a look. Add a stack and give it a name. Note: a stack name may not contain spaces or capital letters among some other characters.
You’ll notice a web editor is present, that’s because stacks are defined in YAML format, this is because stacks are Portainer’s interpretation of Docker compose. Copy over the following code:
services:
  db:
    image: mysql:5.7
    volumes:
      - db_data:/var/lib/mysql
    restart: always
    environment:
      MYSQL_ROOT_PASSWORD: somewordpress
      MYSQL_DATABASE: wordpress
      MYSQL_USER: wordpress
      MYSQL_PASSWORD: wordpress

  wordpress:
    depends_on:
      - db
    image: wordpress:latest
    volumes:
      - wordpress_data:/var/www/html
    ports:
      - '8000:80'
    restart: always
    environment:
      WORDPRESS_DB_HOST: db
      WORDPRESS_DB_USER: wordpress
      WORDPRESS_DB_PASSWORD: wordpress
      WORDPRESS_DB_NAME: wordpress

volumes:
  db_data: {}
  wordpress_data: {}
It’s okay to be overwhelmed, but don’t worry, we will break it down into simple steps. This file describes, to docker, exactly how to build a WordPress site, with an included database. All the settings are described, meaning if you deploy this on one system or the other, the end result should be exactly the same. Let’s take a look!
version: "3.9"
You always start with the version number; this is the Docker Compose version. Do not worry much about this, 3.9 is currently the most recent version, but I still use version 2.4 for many of my stacks without issue.
services:
With services, we denote the different containers that will be build, starting with:
db:
  image: mysql:5.7
  volumes:
    - db_data:/var/lib/mysql
  restart: always
  environment:
    MYSQL_ROOT_PASSWORD: somewordpress
    MYSQL_DATABASE: wordpress
    MYSQL_USER: wordpress
    MYSQL_PASSWORD: wordpress
This describes the database, named db in this example. You’ll notice that we describe things hierarchical with indentations. These are important to creating a valid stack, but the editor will warn you of any errors.
Our database service has 4 main parts:
image: mysql:5.7
This is the image used, like ubuntu/apache2. Notice the notation, this is an official Docker container that does not include an author. Also notice :5.7, these are tags denoting the release, in this case version 5.7, other common tags are stable, latest. If none is specified, latest will be assumed.
volumes:
  - db_data:/var/lib/mysql
Just as before, this is a volume. db_data is the path on the host system, everything behind the colon is what this is mapped to on the container system.
environment:
  MYSQL_ROOT_PASSWORD: somewordpress
  MYSQL_DATABASE: wordpress
  MYSQL_USER: wordpress
  MYSQL_PASSWORD: wordpress
Lastly and perhaps most importantly, these are environmental variables, they tell the application what settings to start with. For these, you will always have to consult the docker’s manual, as every container will have different variables. In this case, they are connection credentials for the database.
Now we do the exact same for our WordPress service/container.
wordpress:
  depends_on:
    - db
  image: wordpress:latest
  volumes:
    - wordpress_data:/var/www/html
  ports:
    - '8000:80'
  restart: always
  environment:
    WORDPRESS_DB_HOST: db
    WORDPRESS_DB_USER: wordpress
    WORDPRESS_DB_PASSWORD: wordpress
    WORDPRESS_DB_NAME: wordpress
You’ll notice it’s mostly the same, we also pass the database credentials, so WordPress can connect to our database service/container.
ports:
  - '8080:80'
One change is ports, in this case we specify that the container should map the external port 8080 to the internal port 80 that WordPress will be listening on. This is so that we do not have a conflict with our previous apache2 container that is also listening on port 80.
volumes:
  db_data: {}
  wordpress_data: {}
Lastly, besides the 2 services/containers we just defined, we will define 2 volumes, one for each of the containers. Now let’s try it out!

Your stack should have been created, click it and take a look. Both containers have been created and automatically named. Note: If you want a different name, you can specify this with the keyword container_name.

If you go over to http://localhost:8080, you should see the WordPress setup page. Congratulations with your first stack! You’ll notice that this gives you a great overview of your services created, but you might still ask yourself how this is better, it seems quite complicated and tedious, right? Well to do the same without a stack, we would have had to fill in every single line individual across several menus, twice. Once for each container. A small but important caveat, almost every container image has an example compose.yaml file in the documentation that you can copy and edit. This makes deploying complex services very easy!
Should you want to learn more about Docker Compose, take a look at the official documentation: https://docs.docker.com/compose/
Conclusion
If you followed along until the end, you should have learned about containers and Docker, as well as how to install Portainer and use it to manage your containers. Personally, Portainer was my gateway into containers, it simplified it enough, so I could do what I knew and allowed me to explore everything at my own pace. I hope this can be the same case for you, as the world of containers is amazing.
Sources
- Docker. (n.d.). Quickstart: Compose and WordPress. Retrieved 02 10, 2022, from docs.docker.com: https://docs.docker.com/samples/wordpress/
- Docker. (n.d.). what-container. Retrieved 02 06, 2022, from Docker: https://www.docker.com/resources/what-container
- Portainer. (2021, 12). Installing portainer on linux with docker. Retrieved 02 08, 2022, from Portainer.io: https://docs.portainer.io/v/ce-2.9/start/install/server/docker/linux
- Portainer. (n.d.). Manage Docker and Docker Swarm environments | Portainer. Retrieved 02 6, 2022, from Portainer.io: https://www.portainer.io/solutions/docker
- Putz, P. (2021, 09 29). Kubernetes vs Docker: What’s the difference? Retrieved 02 8, 2022, from Dynatrace.com: https://www.dynatrace.com/news/blog/kubernetes-vs-docker/